Nanoblading: The Ultimate Guide to Fuller, Natural-Looking Brows That Last

I know exactly how frustrating it can be to deal with thin, uneven, or barely-there eyebrows. For years, I spent countless mornings trying to fill them in, only to end up with smudged or unnatural results by the afternoon. If you’ve ever felt like your eyebrows never look quite right or last throughout the day, trust me—you’re not alone. It can feel like no matter how much time or effort you put in, achieving that natural, full look is out of reach.
When I jumped into the beauty industry and started to learn beauty tips, I discovered nanoblading, and it completely changed the game for me. This incredible technique gave me the fuller, natural-looking brows I always wanted without the daily struggle. In this article, Being a Cosmetic Artist, I’m going to share everything I’ve learned about this wonderful technique: how it works, who it’s for, and how you can finally get those perfect brows that last.
Let’s explore it!
What is Nanoblading?

It’s a semi-permanent cosmetic procedure designed to enhance the appearance of your eyebrows. It’s a more precise and refined version of microblading, which uses ultra-fine, nano-sized needles to deposit pigment into the skin. Unlike traditional tattooing, this technique creates individual hair-like strokes that mimic the natural look of real eyebrow hairs.
The main advantage of this method over other brow-enhancing techniques is its precision. The smaller needles allow for more controlled and detailed strokes, resulting in softer, more natural-looking brows. Whether you have sparse eyebrows or want to enhance your natural shape, this unique technique provides long-lasting results with minimal upkeep.
Nanoblading vs Microblading vs Nano Brows
When it comes to enhancing your eyebrows, you might have heard about different techniques like nano brows and microblading. Let’s compare these three unique techniques:
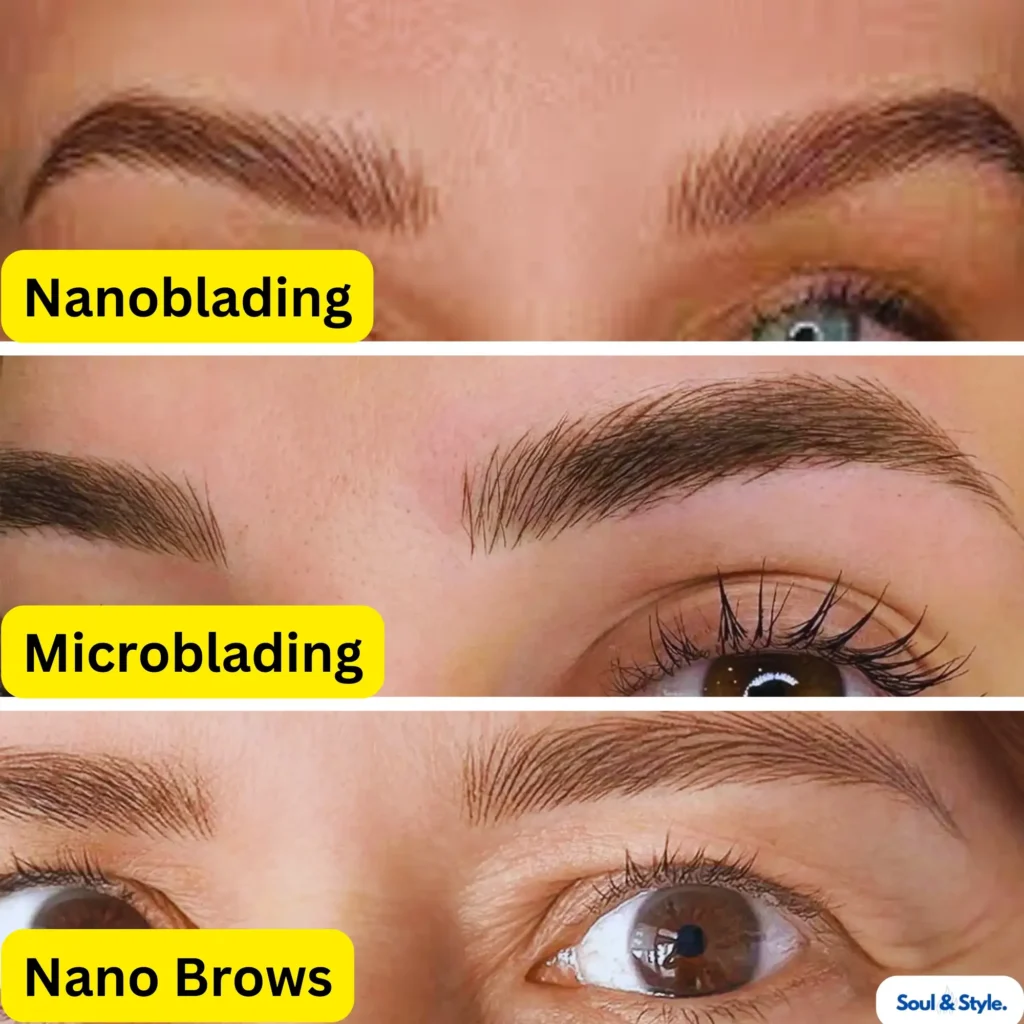
| Technique | Description | Key Benefits |
| Nanoblading | Uses an ultra-thin, nano-sized needle for finer, hair-like strokes that closely resemble real eyebrow hairs. | – Softer, more natural look- Long-lasting results- Faster healing compared to microblading |
| Microblading | Uses a hand-held tool with tiny blades to create small cuts and deposit pigment for fuller-looking brows. | – Natural appearance- Larger strokes than nanoblading- May look less realistic over time |
| Nano Brows | The final result of nanoblading, characterized by delicate and refined hair-like strokes for a fuller brow look. | – Natural, fuller eyebrows- Refined and seamless blend with natural brow hairs |
Who Should Get Nanoblading?
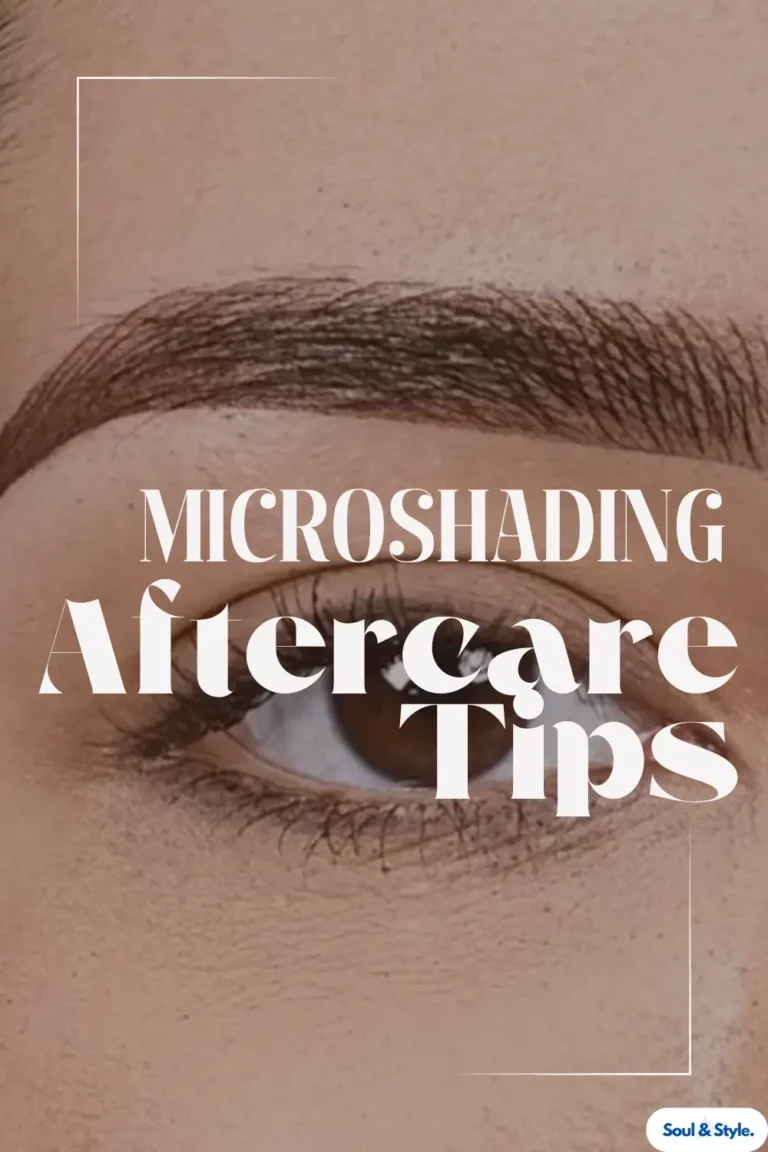
It’s a great option for anyone looking to enhance their eyebrows, especially those who have sparse, thin, or uneven brows. If you find yourself spending too much time filling in your eyebrows with makeup or are unhappy with their shape, this treatment and other treatments like microshading can be the solution you’ve been searching for.
This procedure is also ideal for individuals who have experienced hair loss due to aging, over-plucking, or medical conditions like alopecia. This technique Can restore the appearance of natural brows, boosting your confidence and saving you time in your daily routine. Plus, the results are customizable, allowing you to achieve the exact look you want—whether it’s a subtle enhancement or a dramatic transformation.
How to Prepare for This Treatment
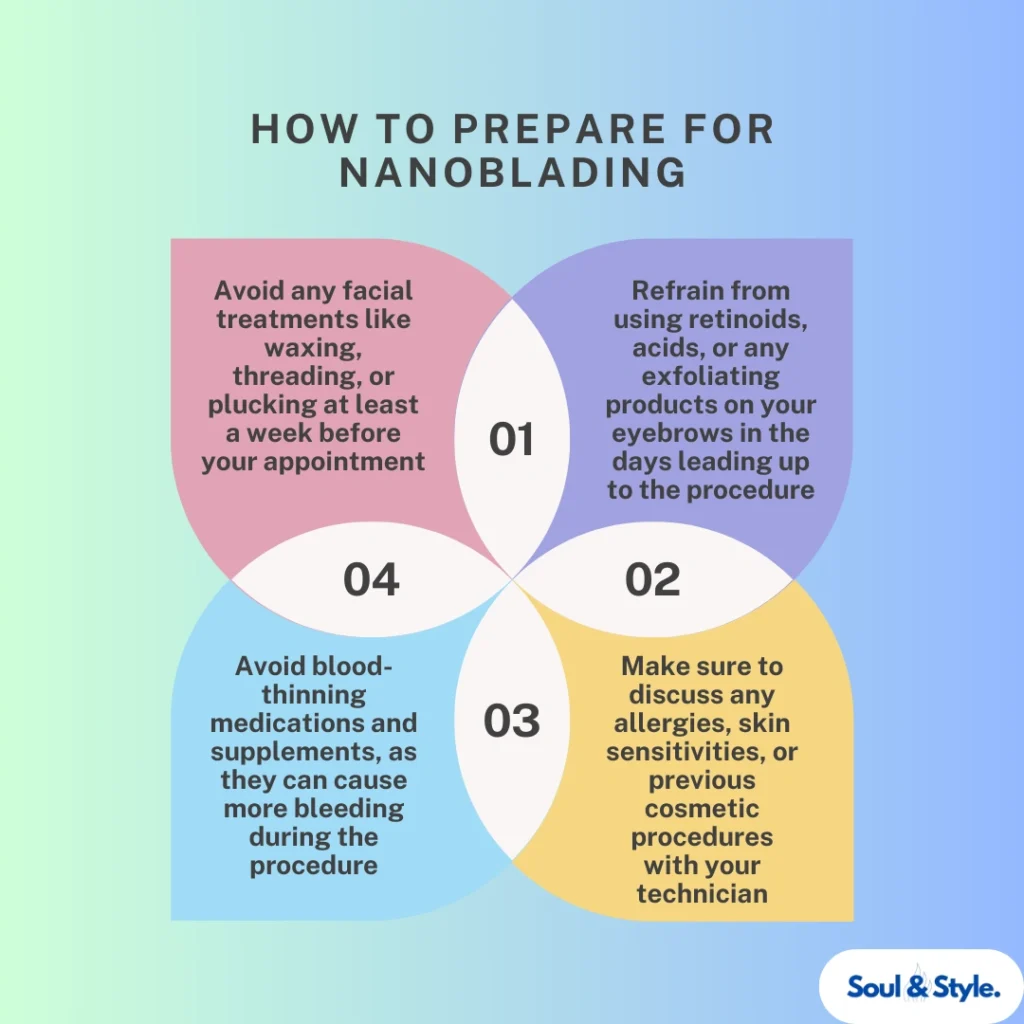
Before undergoing this treatment, it’s important to prepare to ensure the best results properly. Here are my experienced things you can do:
- Avoid any facial treatments like waxing, threading, or plucking at least a week before your appointment.
- Refrain from using retinoids, acids, or any exfoliating products on your eyebrows in the days leading up to the procedure.
- Avoid blood-thinning medications and supplements, as they can cause more bleeding during the procedure.
- Make sure to discuss any allergies, skin sensitivities, or previous cosmetic procedures with your technician.
How is Nanoblading Done? The Complete Step-by-Step Process
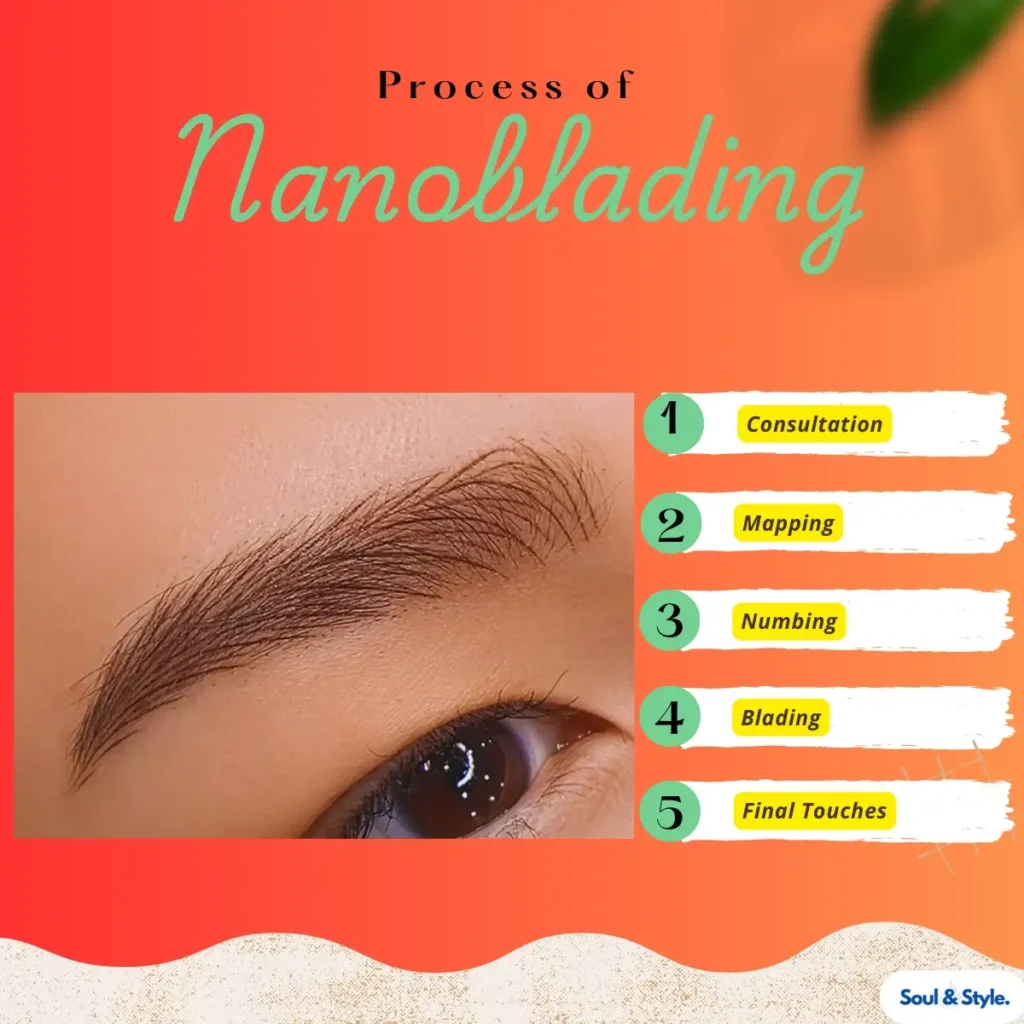
It’s a meticulous procedure that demands precision and expertise to create natural, long-lasting results. If you’re considering this technique for fuller, well-shaped brows, it’s important to know what to expect during the process. Here are my experienced step-by-step guides that’ll completely easily describe the whole process:
- Consultation
The process begins with a thorough consultation where your technician will examine your natural brows, discuss your goals, and explain the procedure. This is the perfect time for you to ask any questions or express any concerns you may have. The technician will assess factors like your face shape, skin type, and overall aesthetic preferences to design the perfect brows for you.
- Mapping
Next, the technician will outline your ideal brow shape using a special pencil. This step ensures symmetry and alignment based on your facial features. Mapping is critical because it sets the foundation for a natural and balanced look. At this stage, you can also approve or adjust the shape before moving forward.
- Numbing
To ensure that the procedure is as comfortable as possible, a numbing cream is applied to your brow area. The cream will take a few minutes to take effect, minimizing any discomfort during the blading process. Most clients report little to no pain thanks to this step.
- Blading
The actual process involves using a nano-sized needle to create tiny, hair-like strokes by depositing pigment into your skin. These strokes are designed to mimic natural eyebrow hairs, ensuring that the result looks soft, natural, and realistic. The technician will work with precision to ensure that each stroke is carefully placed for the most natural appearance.
- Final Touches
Once the blading is complete, the technician will make any final adjustments to ensure that your brows look perfect. This might include adding a few more strokes or fine-tuning the shape and pigment. Your technician will also provide you with detailed aftercare instructions to follow during the healing process.
Aftercare and Healing
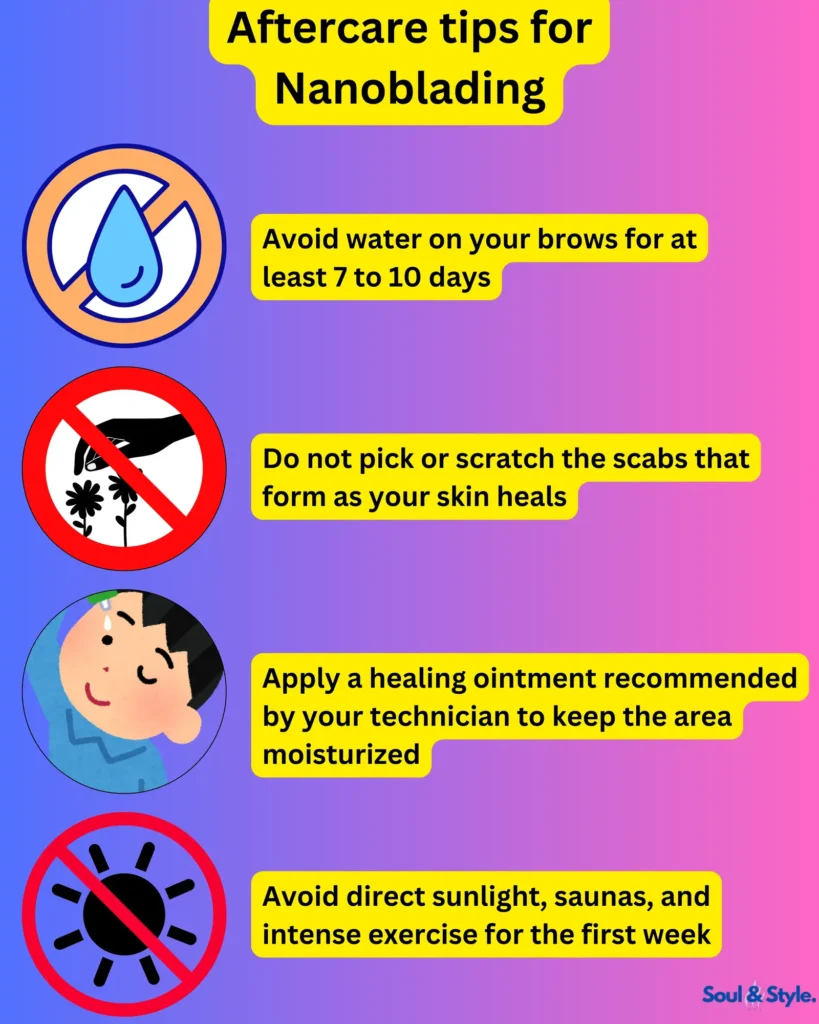
After this treatment, following a proper aftercare routine is necessary to ensure your new brows heal beautifully. Here are my experienced and practiced guides:
- Avoid water on your brows for at least 7 to 10 days. This includes steam from showers, as moisture can cause the pigment to fade.
- Do not pick or scratch the scabs that form as your skin heals. Let them fall off naturally to avoid disrupting the pigment.
- Apply a healing ointment recommended by your technician to keep the area moisturized.
- Avoid direct sunlight, saunas, and intense exercise for the first week to prevent sweating.
The Nanoblading Healing Journey:
| Healing Stage | What to Expect | Care Tips |
| Day 1-2: Dark Appearance | Brows will appear darker than the final result. This is temporary as the pigment settles into the skin. | Keep the area clean and dry. Avoid touching or applying makeup to the brows. |
| Day 3-7: Scabbing and Flaking | Small scabs will form as the skin heals. Flaking is normal, and brows may look uneven during this phase. | Do not pick or scratch at the scabs. Let them fall off naturally to avoid disrupting the pigment. |
| Day 8-14: Lightening Phase | Brows may appear lighter as the scabs fall off and the pigment settles. | Continue to avoid water and moisture on the brows. Use healing ointment as recommended. |
| Week 2-4: Final Healing | The pigment will gradually darken and blend in, reaching the final color by the end of week four. | Keep up with your aftercare routine and avoid exposure to sunlight and harsh chemicals. |
| Touch-Up Session | A touch-up is usually required 6-8 weeks after the initial procedure to perfect the color and shape. | Schedule a touch-up with your technician for best long-term results. |
5 Nanoblading Before and Afters
Its results can vary depending on the desired look. Here are five common transformations you can achieve with nanoblading:
To Add Volume
For those with sparse brows, it adds volume and creates a more defined brow shape.
To Add Lots of Density
This technique is perfect for individuals with thin brows looking to achieve a thicker, fuller look.
To Add a Bit of Fullness
If your brows just need a slight enhancement, it can add subtle fullness for a natural finish.
To Darken and Reshape
It can darken light brows and correct uneven shapes for a more polished look.
To Add Definition
This technique creates precise, hair-like strokes to enhance the natural definition of your brows.
Benefits of Nanoblading
It offers several benefits that make it a top choice for those seeking fuller, natural-looking brows:
- Natural Appearance: The ultra-fine strokes mimic the look of real eyebrow hairs, creating a soft and natural look that blends seamlessly with your existing brows.
- Long-Lasting Results: With proper care, it can last up to 18 to 24 months, making it a low-maintenance solution.
- Customization: Whether you want a subtle enhancement or bold brows, it can be customized to your desired shape, color, and thickness.
- Time-Saving: You’ll no longer need to spend time filling in your brows every morning, which can save you valuable time in your beauty routine.
- Boost in Confidence: Fuller, well-shaped brows can enhance your overall facial features, giving you a confidence boost.
The Pain: Does This Treatment Hurt?
I experienced one of the most common questions people have about this technique is whether it hurts. While everyone’s pain tolerance is different, most people report that the procedure is relatively painless. Before starting, the technician applies a numbing cream to ensure you’re as comfortable as possible.
During the procedure, you might feel a slight scratching sensation, but it’s generally very mild. If you’re particularly sensitive, let your technician know: they can reapply numbing cream throughout the process to keep you comfortable.
Side Effects and Risks
Like any cosmetic procedure, nanoblading comes with some potential side effects and risks, though they are usually minimal when performed by a trained professional. Here’s what to keep in mind:
- Temporary Swelling or Redness: After the procedure, you might experience slight swelling or redness around your eyebrows. This typically subsides within a few hours to a day.
- Scabbing: It’s normal for small scabs to form as your skin heals. It’s important to avoid picking at these scabs to avoid disrupting the pigment.
- Allergic Reactions: In rare cases, some individuals may have an allergic reaction to the pigment used in this technique. Make sure to discuss any allergies with your technician before the procedure.
- Infection: If aftercare instructions are not followed properly, there’s a small risk of infection. Keeping the area clean and dry is critical during the healing process.
How Much Does it Cost?
The cost of this technique can vary depending on several factors, including the location of the salon, the expertise of the technician, and the specific needs of your brows. On average, it can range from $300 to $800 per session. It’s important to remember that this is a semi-permanent procedure, so while the upfront cost may seem high, it can actually save you money in the long run by reducing the need for eyebrow makeup and touch-up treatments.
How Long Nanoblading Lasts
It offers long-lasting results, typically ranging from 18 to 24 months. The longevity of your results depends on factors such as your skin type, lifestyle, and how well you follow aftercare instructions. For instance, individuals with oily skin may notice that their brows fade faster compared to those with drier skin.
It’s recommended to schedule a touch-up session around 12 to 18 months after your initial procedure to maintain the look and ensure the pigment remains fresh and vibrant.
The Takeaway
If you’re tired of spending time perfecting your eyebrows every morning or want a more long-lasting solution to sparse or uneven brows, nanoblading might be the perfect solution for you. This advanced, semi-permanent technique provides natural, fuller-looking brows with minimal effort and upkeep. By understanding the process, following the aftercare, and ensuring you’re working with a skilled professional, you can achieve brows that not only look great but last for up to two years.
FAQs
Q1: How long does this procedure take?
A typical session lasts between 2 to 3 hours, including consultation, mapping, and the actual blading process.
Q2: Can this technique be done on all skin types?
Yes, it can be done on most skin types, but results may vary. People with oily skin may need more frequent touch-ups due to faster fading.
Q3: Is this technique safe?
When performed by a trained and experienced professional, this technique is generally safe. However, it’s important to follow aftercare instructions to prevent infections or complications.
Q4: Will my brows look too dark after this treatment?
Initially, your brows will appear darker, but they will lighten during the healing process, revealing a softer, more natural color within a few weeks.
Q5: How soon can I wash my face after this treatment?
It’s important to avoid getting your eyebrows wet for at least 7 to 10 days after the procedure. You can clean around the brows with a damp cloth, but avoid direct contact with water.